 Frame Command
- Step-By-Step
- Tips and Tricks
- Related Tools
1 . Preselect a rolled section material to enable the Materials contextual page and click the Frame icon found in the Operations section. Skip step 2.
Alternative : Invoke Frame using the Find Tool by searching the command name and clicking the Frame icon, which is pictured above. Proceed to step 2.
Learn more about alternative methods for launching commands.
2 . Skip this step if you already selected a material in step 1.
2a : The status line prompts, "Locate material to frame."Select One Item" Select - Pan - Menu mouse bindings become active. Left-click (Select) the rolled section material you want to frame. This prompting also occurs when more than one submaterial or a member (rather than a submaterial) is selected before invoking the command.
Types of material that Frame can be used with: wide flange , S shape , angle , channel , HSS round (pipe) , HSS rectangular , W tee , S tee , welded plate wide , welded plate box , beaded flat , rail , cold formed C or cold formed Z
3 . The status line prompts, "Locate material to frame to." Select - Pan - Menu mouse bindings become active.
Alternative 1 : Place the mouse pointer (
) on the rolled section you want to frame to (this material will NOT be altered), then left-click ( Select ). Or right-click ( Menu ) then choose the piecemark of the material on the context menu . Go to step 5.
Alternative 2 : Press the Esc key (or right-click and choose "Cancel" on the context menu) to cancel the Frame operation and keep everything as it was before step 2. Do not continue.
4 . The Material Framing window opens. On it are the following entry fields:
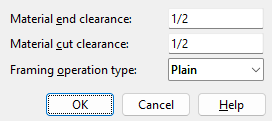
Material end clearance: The positive or negative (-) distance (in the primary dimension "Units" or other units) that you want the framing material to be set back from the material it frames to. A positive clearance shortens the material. A negative (-) clearance lengthens the material. This distance is added to the "Material setback" on the end of the rolled section being framed. For example: The current "Material setback" is '5'. If you enter '5' inches here, the resulting "Material setback" is '10' inches.
Material cut clearance: The positive or negative (-) distance (in the primary dimension "Units" or other units) that you want to separate the framing material from the face of the material being framed to when a material cut is required on an end of the material being framed. A positive clearance results in a gap between the end of the framing material and the face of the material being framed to.
Framing operation type: Plain or Field weld or Shop weld . Select 'Plain' if the two materials are not going to be welded together. Select 'Field weld' or 'Shop weld' if you want welding flange and web preparation on the material being framed. The choice is applied as the "Top/bottom flange operation" on the end of the rolled section being framed.
![]()
![]()
Alternative 1 : Enter the choices you want to the above entry fields and press the "OK" button at the bottom of this window. Go to step 6.
Alternative 2 : Press the "Cancel" button to end the Frame operation and keep everything as it was before step 2. Do not continue.
5 . The Change All Options window opens. On it is a "Warnings" list. Material change "Options" become active along with the Warnings if the 3D model contains other pieces of material with the same submaterial piecemark as the material you performed this operation on.


Alternative 1 : Make the appropriate selections on this window, then press the "OK" on the bottom of the window to regenerate the material. For the material that is being framed (but not the material framed to), Frame calculates the material setback, generates the appropriate copes and flange preparations, and updates the material edit window.
Alternative 2 : Press the "Cancel" button to end the Frame operation and keep everything as it was before step 2. Do not continue.
- Both materials must be rolled sections.
- Frame calculates the material setback and generates the appropriate copes and flange preparations for the material being framed (but not the material framed to).
- To select a member main material, hover the material and right-click ( Menu ) and choose "Select Other" on the context menu , or just click the material with the selection filter set to 'Material'.
- Performing Frame on a member main material makes that main material user main material.
-
You can review the changes made to the material(s) using Frame by looking at the "Left/right material setback" and "Left/right top/bottom flange operation" fields on the material edit window of the affected material.
- To undo Frame : Clear the "Left/right material setback" and "Left/right top/bottom flange operation" settings on the Rolled Section Material window of the material that was framed.
- Frame cannot be performed when the member that the material is located on has the Model complete date set.
- Examples:
| wide flange
to wide flange 
|
pipe
to wide flange 
|
W tee
to wide flange 
|
- Rolled Section Material (You can Frame any material governed by this window)
- Adding a rolled section
- Material Fit Exact
- Material Fit Cope

